ComfyUI: A Beginner's Guide about Text2Img and previewable Img2Img - ComfyUI: 关于文生图和可以预览的图生图基础教程
Dream it, create it, share it. - 梦想成真,创作自由。
Getting Started with Text-to-Image - 从文生图开始
Starting with AI tools like ComfyUI can be intimidating, especially when you’re new to the world of text-to-image generation. But here’s the thing: every great artist started as a beginner. Mastering the basics isn’t just a checkbox on your journey; it’s the foundation that supports everything you’ll build in the future. That’s why we’re diving into the nitty-gritty details of setting up your ComfyUI workflow from scratch.As the ancient Chinese philosopher Xunzi said, “Not hearing is not as good as hearing, hearing is not as good as seeing, seeing is not as good as knowing, knowing is not as good as acting; true learning stops at action.” In other words, mastery begins with practice, and practice starts with imitation.
Those of you who read my last tutorial should already be able to get ComfyUI running locally, so let's just launch ComfyUI. Go to ComfyUI's interface. Getting started with ComfyUI may seem daunting at first, but once you break it down, it’s actually quite straightforward—especially if you take things step by step. Let’s dive into creating a basic text-to-image workflow, focusing on the essentials without getting bogged down in too many details.
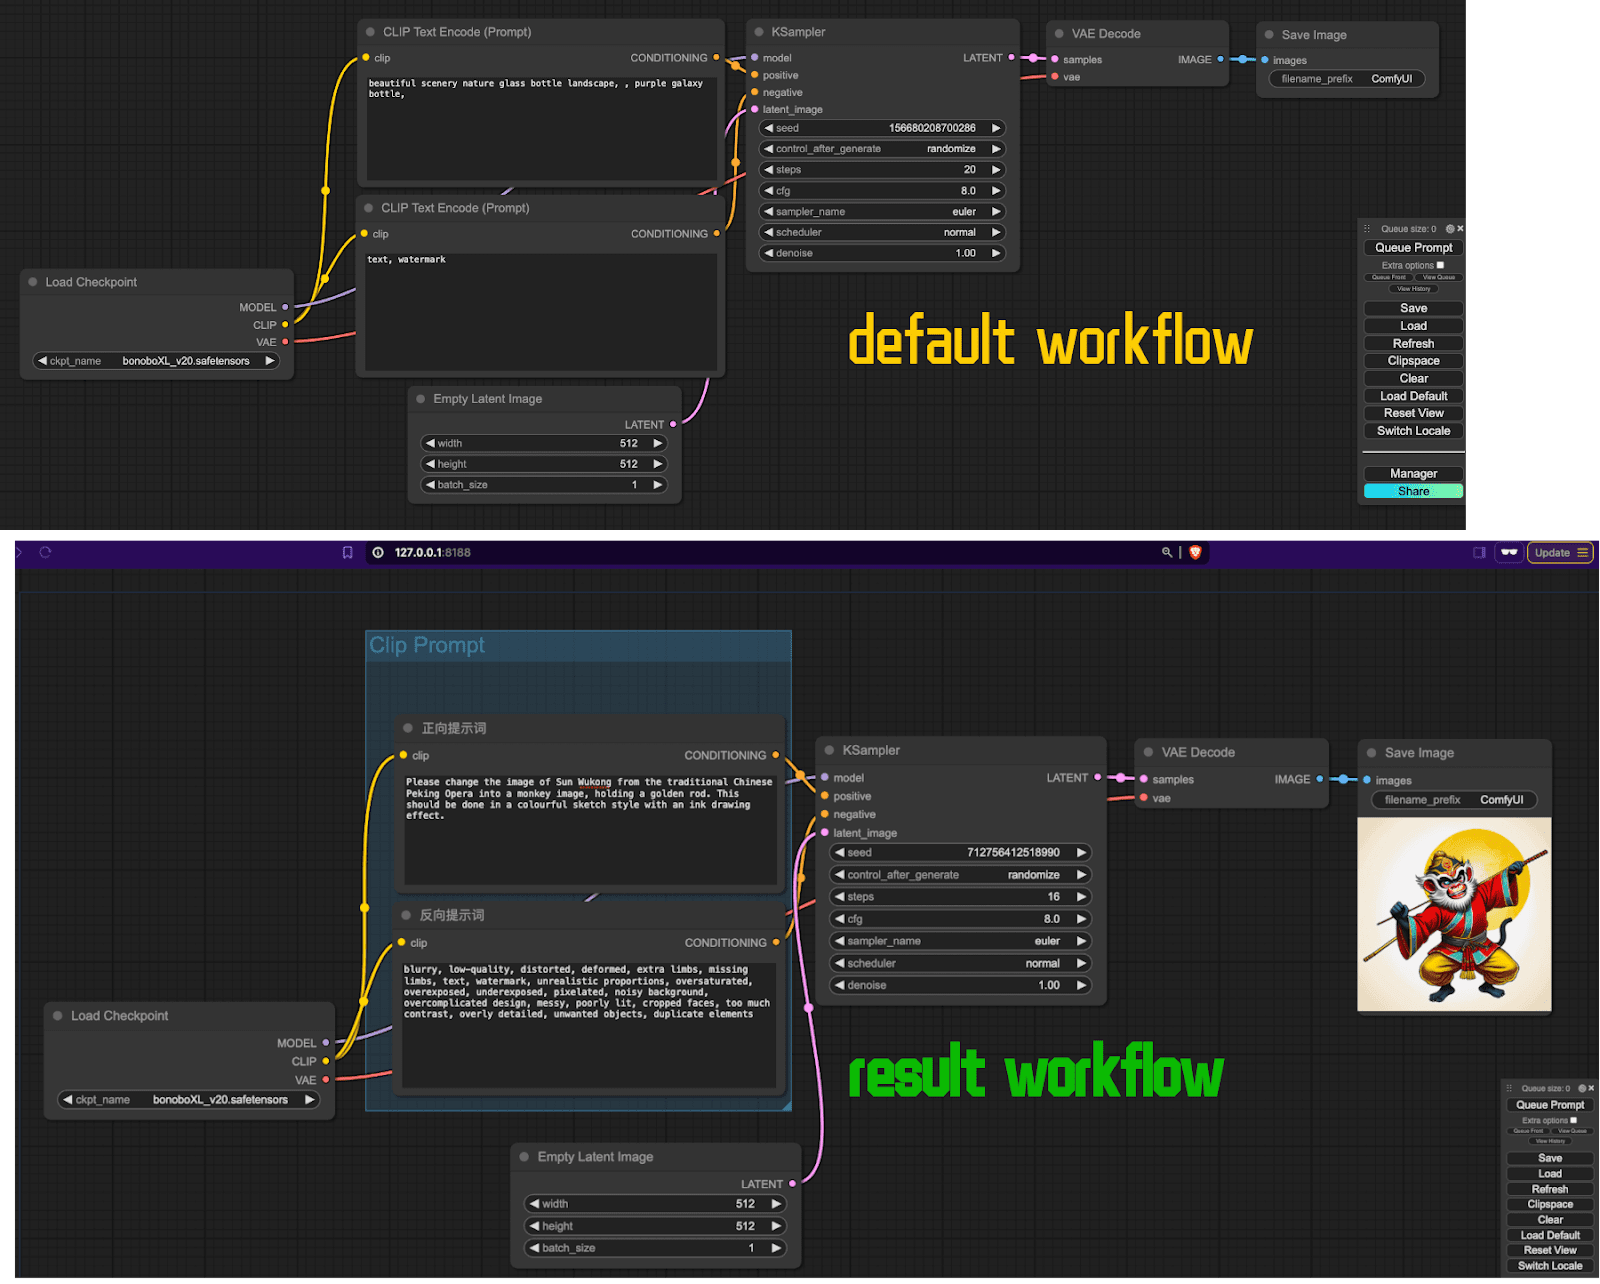
First, in the main control panel, hit the “Clear” button to start fresh by clearing all existing panels. Next, we’ll manually create a simple text-to-image workflow based on the default workflow image provided by ComfyUI.
Adding new panels is easy. You have two methods: one is to drag a connection line from an existing node to an empty spot, releasing it to bring up a menu of panel options. The other, quicker method is to double-click on a blank area, type the panel’s name into the search box, and hit enter to add it. For this example, we’ll use the second method to save time.
Start by adding the KSampler panel. Double-click in an empty spot, type “KSampler,” and hit enter. Set the steps value to 16 for a quick result—this will keep the image quality reasonable without taking too long to generate. Remember, this is just a starting point; feel free to adjust the workflow to suit your preferences. Why start with KSampler? There is no reason, people can start making their own workflows from their favourite panel.
Next, add two CLIP Text Encode panels in the same way—one for positive prompts and one for negative prompts. Then, add an Empty Latent Image panel. This panel has three parameters: width, height, and batch size. Width and height are self-explanatory, and batch size controls how many images are generated at once. For this example, we’ll stick to the default value of 1 to keep things simple.
After that, add the Load Checkpoint, VAE Decode, and Save Image panels. In the Load Checkpoint panel, choose the AI model you want to use. If you haven’t downloaded any models yet, you can grab one from sites like Civitai or TusiArt. Just drop the model into the ComfyUI/models/checkpoints folder and restart ComfyUI to load it.
Next, connect the panels as shown in the default workflow image. There are three key connections to pay attention to: connect the Model node from the Load Checkpoint panel to the model node in KSampler; connect the VAE node from Load Checkpoint to the vae node in the VAE Decode panel; and connect the LATENT node in the Empty Latent Image panel to the latent_image node in KSampler. These connections are crucial for the workflow to function correctly.
To avoid confusion between the two CLIP Text Encode panels, rename them by right-clicking the panel, selecting “Title,” and typing in a custom label like “Positive Prompt” and “Negative Prompt.” You can also right-click the panel and select “Colors” to assign a color for easy identification.
Finally, if you want to organize your panels better, you can group them. Right-click on an empty area, select “Add Group,” and rename the group to something like “Clip Prompt.” Drag the group’s corner to include the two CLIP Text Encode panels. This way, moving the group will move both panels together.
Positive prompt(The positive prompt is the Monkey King Qi Tian Da Sheng Sun Wukong as an example):
Please change the image of Sun Wukong from the traditional Chinese Peking Opera into a monkey image, holding a golden rod. This should be done in a colourful sketch style with an ink drawing effect.
Negative prompt:
blurry, low-quality, distorted, deformed, extra limbs, missing limbs, text, watermark, unrealistic proportions, oversaturated, overexposed, underexposed, pixelated, noisy background, overcomplicated design, messy, poorly lit, cropped faces, too much contrast, overly detailed, unwanted objects, duplicate elements
Now that everything is set up and you’re ready to generate your first image. Input your positive and negative prompt, and hit the “Queue Prompt” button. If everything is connected correctly, you’ll see a green light, indicating that your image is being generated. Wait a little while and you'll see the results.
Diving into Image-to-Image - 潜进图生图
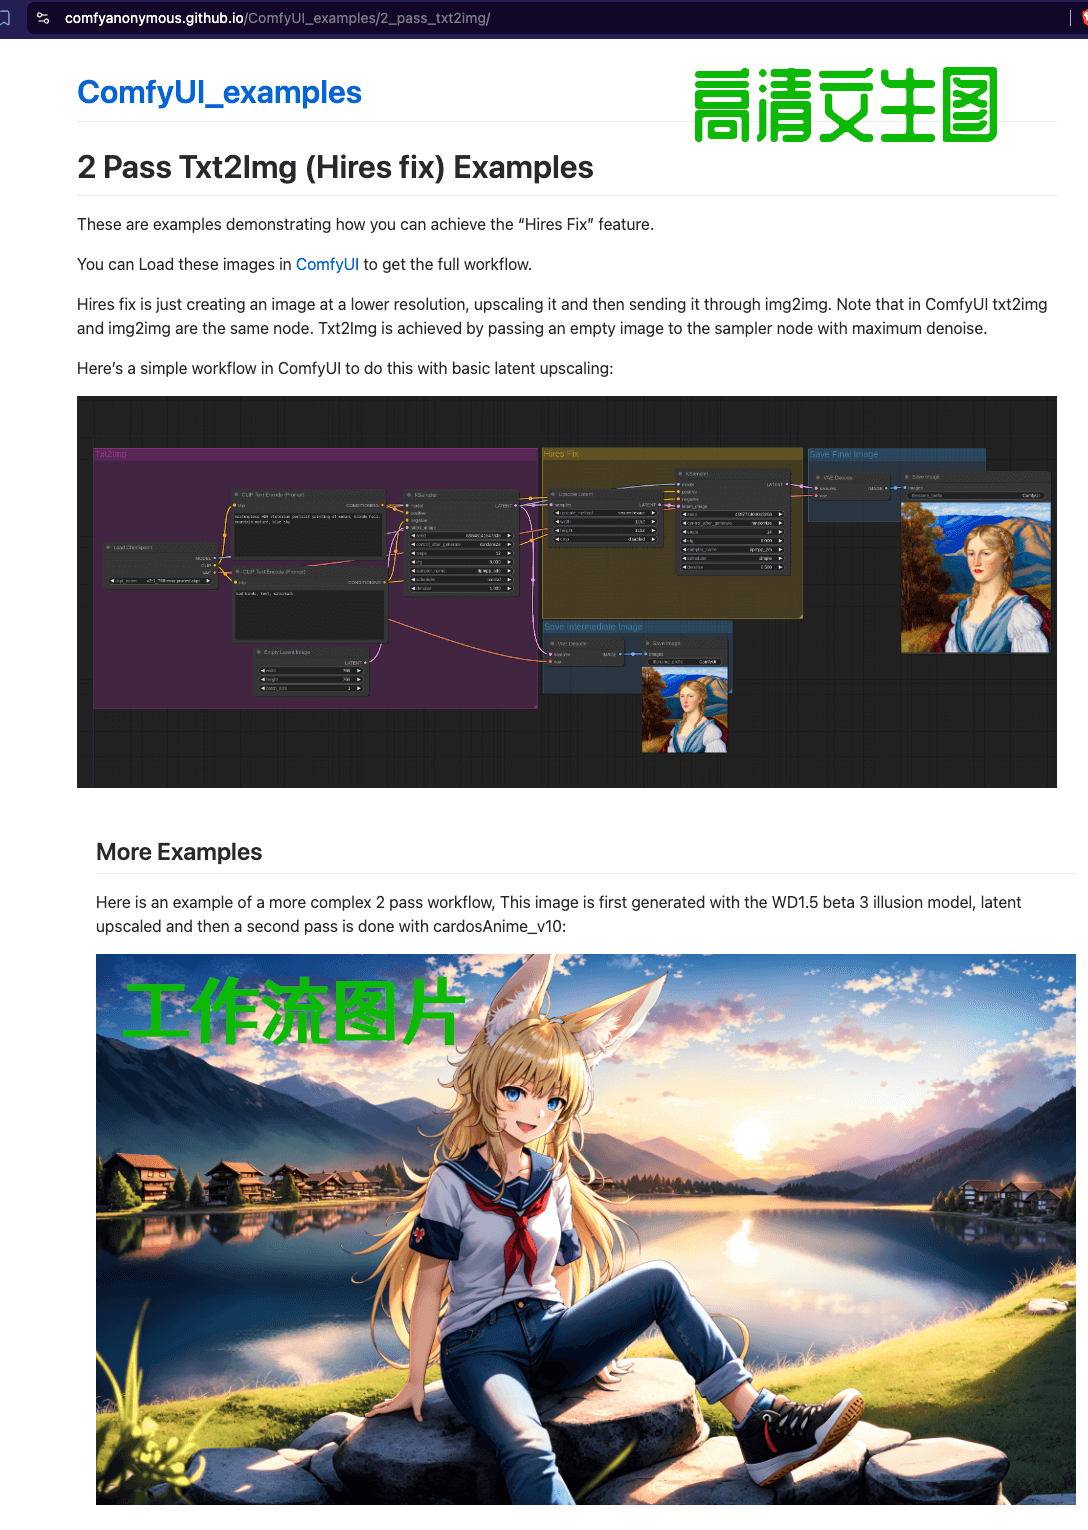
Exploring image-to-image generation (Img2Img) in ComfyUI is an exciting next step after mastering text-to-image. To start, head over to the ComfyUI GitHub page and scroll down to the “ComfyUI Examples” section. Why are these examples important? Because learning often begins with imitation, and these official workflows are the best learning material you can get your hands on. Did you know that some people even sell these examples as tutorials when in reality they are all free?
Let’s break it down: ComfyUI has provided several example workflows. It is a great starting point. The process is simple: save a screenshot of the 1st example(This example generates a high-resolution text-to-image.), clear your workspace in ComfyUI, and then drag in an image to replicate the workflow locally. Instead of pressing the Clear button, you can also drag and drop the saved example image directly. Compare the results to see if your output matches the original. Practicing like this helps you learn by doing, and the more you practice, the better you’ll get. After all, practice makes perfect. Friends, by the time you have completed this step, you actually know how to use a workflow that someone else has already created. For most of you, this is enough. But for those of you who are looking for something more, those of you who want to create brainstorming and indescribable scenarios, we have to move forward step by step.
Now, let’s dive into the 2nd example. Open the Img2Img example from the ComfyUI GitHub and start by mimicking the provided workflow. Take a screenshot of it and use it as your reference. This is literal copying—just like copying homework in school. But here, copying the official examples is the best way to learn, and these examples are freely available for everyone to use. There’s no need to pay for tutorials on this; the official resources are more than enough.
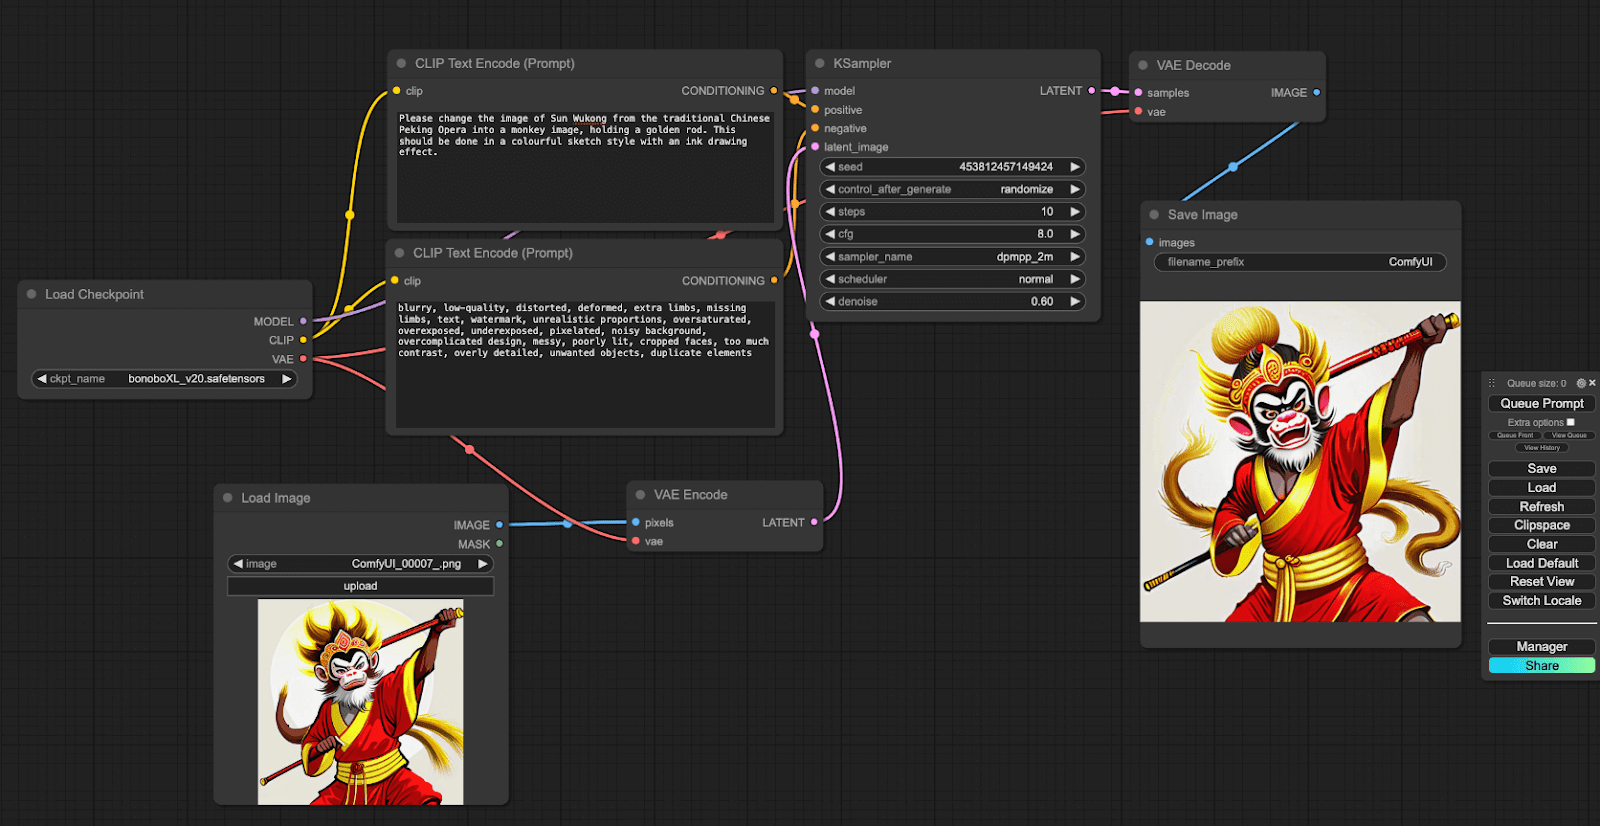
Save the reference image of Img2Img, let’s start building the workflow in ComfyUI. The core of Img2Img is still based on the text-to-image(last example) process, with the addition of some new panels. Start by double-clicking in a blank area and adding a Load Image panel, followed by a VAE Encode panel. Connect the IMAGE node from the Load Image panel to the pixels node in the VAE Encode panel. Then, connect the VAE node from Load Checkpoint to the vae node in the VAE Encode panel. Finally, link the LATENT node in VAE Encode to the latent_image node in KSampler.
For this example, set the steps in KSampler to 10—enough to see results without needing high image quality. Load an image, like a picture of Sun Wukong(Those of you who have seen my last tutorial will know that this picture of the Monkey King was generated from the last tutorial), in the Load Image panel, the prompts remain the same as in the previous example, hit the “Queue Prompt” button, and wait for the results. This simple process will show you how Img2Img works in ComfyUI, giving you a solid foundation to build on.
Previewable Image-to-Image - 标本图片可预览的图生图
Now that you’ve seen the basic results, let’s build on that foundation by exploring a previewable image-to-image workflow in ComfyUI. This will allow you to make real-time adjustments to your images, offering a level of control that can be incredibly useful.
To begin, double-click in a blank area of the ComfyUI workspace, type Upscale Image By into the search bar, and press enter to add this panel. Then, from the right side of the Upscale Image By panel, drag a line out from the IMAGE node, release it in a blank area, and select Add Node. Navigate through the menu to select image, then Upscaling, and finally choose Upscale Image. Next, add a Preview Image panel by following the same process: double-clicking, searching, and selecting. Finally, add a Load VAE panel.
Now, let’s connect these new panels to create our updated workflow. Start by disconnecting the VAE connection at the bottom of the Load Checkpoint panel. Then, connect the IMAGE node from the Load Image panel to the image node on the left side of the Upscale Image By panel. From the right side of Upscale Image By, connect the IMAGE node to the image node on the left side of the Upscale Image panel. Finally, connect the IMAGE node on the right side of Upscale Image to the images node on the left side of Preview Image.
Here’s a quick breakdown: The Upscale Image By panel is used for proportional scaling, while the Upscale Image panel scales the image to specific dimensions. The Preview Image panel shows the results of these adjustments in real time. This setup allows you to take a sample image, make adjustments, and immediately see the results in the Preview Image panel. This is particularly useful for ensuring your image has the correct dimensions or for focusing on a specific part of a larger image.
To ensure you see real-time updates, go to the main control panel and check the Extra Options box, then check Auto Queue. Now, when you adjust the dimensions in the Upscale Image panel, the preview will update automatically. After you’ve fine-tuned your image, it’s best to uncheck Extra Options to save computing resources.
Next, adjust the workflow further by disconnecting the IMAGE node from Load Image to VAE Encode. Instead, connect the IMAGE node on the right side of Upscale Image to the pixels node on the VAE Encode panel. Also, disconnect the VAE connection between Load Checkpoint and VAE Encode, as we will use a custom VAE instead.
To use a custom VAE, download it from Civitai. For this example, we’re using “VAE 560000” because of its smaller file size and faster output. Place the downloaded file in the ComfyUI/models/vae folder and restart ComfyUI to use it. After restarting, connect the VAE node from the VAE Encode panel to the Load VAE panel, then connect the VAE node from Load VAE to the vae node in the VAE Decode panel.
Positive prompt:
Please change the colour of the Monkey King to blue.
Negative prompt:
blurry, low-quality, distorted, deformed, extra limbs, missing limbs, text, watermark, unrealistic proportions, oversaturated, overexposed, underexposed, pixelated, noisy background, overcomplicated design, messy, poorly lit, cropped faces, too much contrast, overly detailed, unwanted objects, duplicate elements
And that’s it! You’ve now created a previewable, customizable image-to-image workflow. Hit the Queue Prompt button, wait a moment, and see your results!

Quick view Efficiency Nodes - 简介Efficiency Nodes
Downloading Efficiency Nodes for ComfyUI is a breeze, and it's a step I highly recommend for beginners. While you might not need them right away, these nodes can significantly enhance your workflow down the line. The three main benefits? They'll save you time, streamline your processes, and unlock new creative possibilities. Trust me, future you will thank present you for this foresight!
Now, let's talk about how to get these nifty tools. The easiest way is through the ComfyUI Manager - it's like a one-stop shop for all your node needs. Just fire up the manager, search for Efficiency Nodes, click download, and voila! Remember to restart ComfyUI after installation to see your new toys in action. It's that simple!
But hey, if you're feeling a bit more adventurous or just curious about what's under the hood, you can always go straight to the source. The GitHub page is where the magic happens. After downloading it should be placed inside ComfyUI/custom_nodes.

Whether you choose the manager route or decide to download directly from GitHub, the choice is yours. There's no right or wrong way - it's all about what feels most comfortable for you.
Conclusion
Woohoo! You've made it this far, you magnificent AI art rebel! Pat yourself on the back, because you're now officially part of the "I can make weird stuff with computers" club. Remember when your grandma said you'd never amount to anything, staring at screens all day? Well, look at you now, creating mind-bending, possibly questionable masterpieces with a few clicks! Is it art? Is it madness? Who cares! It's your digital playground, and the only limit is your imagination (and maybe some pesky legal guidelines). So go ahead, unleash those wild ideas lurking in the corners of your brain. Create that cat-unicorn-dinosaur hybrid you've always dreamed of. After all, isn't that what youth and creativity are all about?


Comments
Post a Comment