
Turn your toaster into a Leonardo machine! - 让你的破烂电脑秒变达芬奇工作室!

Introduction: The AI Art Revolution - 引言:AI艺术革命来袭
Hold onto your keyboards, folks! The AI art revolution is here, and it's not just for the tech elite anymore. Enter Flux, the new kid on the block that's got everyone talking. With a whopping 12 billion parameters, this open-source powerhouse is giving Midjourney a run for its money. But here's the kicker: you don't need a supercomputer to join the party. We're about to show you how to turn your trusty old PC into a digital Leonardo using ComfyUI and Flux. It's like teaching your grandma to breakdance - unexpected, slightly absurd, but absolutely amazing when it works! So, buckle up as we dive into the world where potato PCs create masterpieces, and maybe, just maybe, we'll spark a debate about whether AI can truly replace human creativity. Spoiler alert: it can't, but it sure makes for a fun ride!
Conducting a Foundational Installation of Flux According to ComfyUI Example - 根据ComfyUI例子做flux基础安装
Hey there, fellow potato-PC warriors! No worries, let’s dive into how to install Flux on your modest machine and make it work its magic, even if you’re rolling with integrated graphics like me.
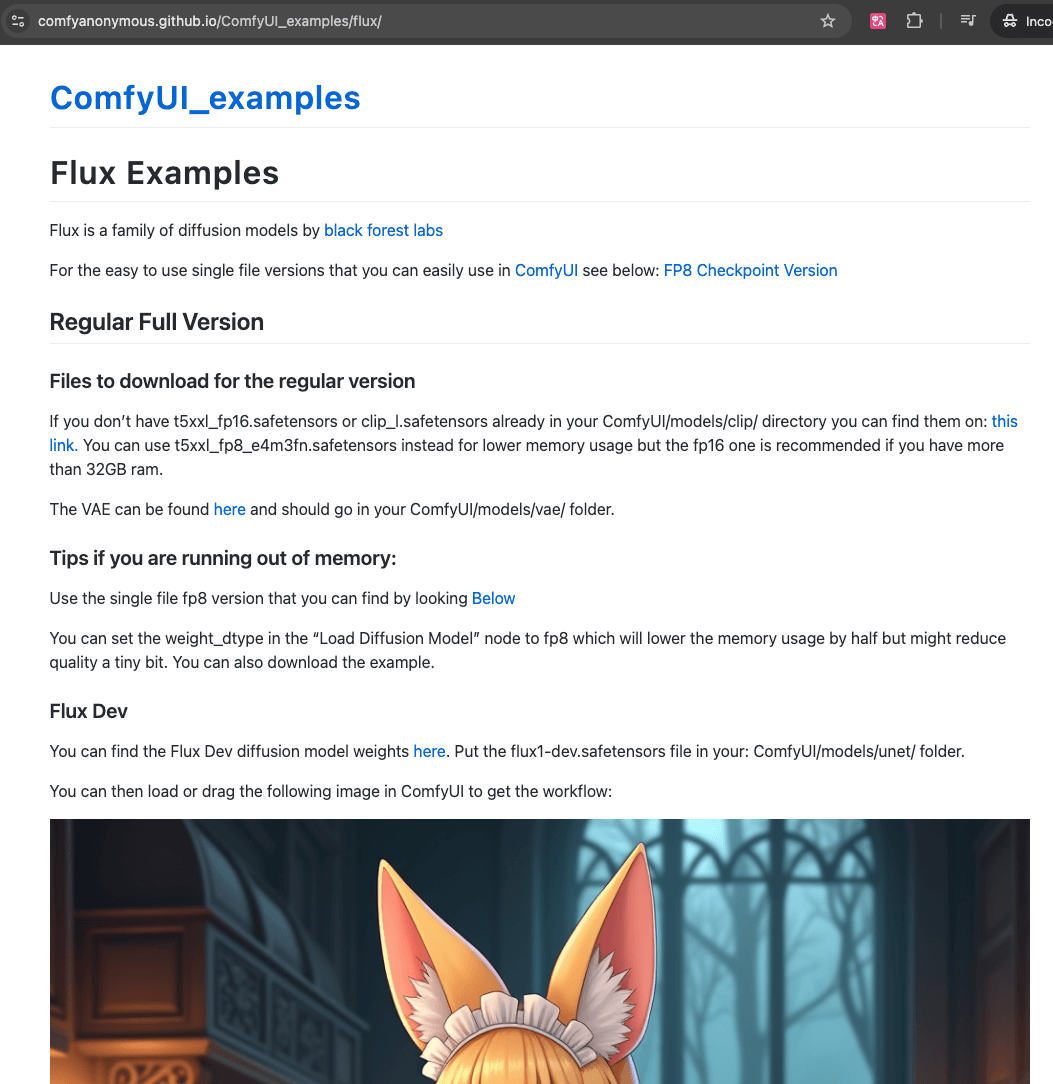
Step one is to follow the example from ComfyUI, because let’s be real—copying the pros is how we all start! Head to ComfyUI’s GitHub page, find the “ComfyUI Examples” section, and scroll a bit until you spot “Flux.” Once you click on it, you’ll see a detailed guide that walks you through the installation process. The first thing to grab is a file called “Clip.” Now, Clip has a few versions, but unless you’re secretly hiding a 32GB beast of a GPU in your PC, you’ll want to go with the lighter option(The t5xxl_fp16.safetensors is for users with more than 32GB of VRAM.). For us, potato-PC gang members, that’s the t5xxl_fp8_e4m3fn.safetensors file. There’s also clip_l.safetensors, which you’ll definitely need. Just click the link, and it’ll whisk you away to Hugging Face for the download. After that, drop the files into the right folder: ComfyUI/models/clip. Boom, Clip is done!
Next up is VAE. It sounds fancy, but it’s really just another file to download. Grab ae.safetensors from the provided official link, and toss it into the ComfyUI/models/vae folder. Simple, right?
Now, onto the Flux models. Here’s the fun part: if you have a shiny GPU, you can use the Dev version. But for us, who are not so blessed in the graphics department, Schnell is the way to go. Download the Schnell model and toss it into ComfyUI/models/unet. Easy peasy!
Finally, it’s time to run ComfyUI. If you’ve got a good GPU (lucky you), the command is simple: python main.py. But for the rest of us, who have to rely on our CPUs, you’ll need to run: python main.py --cpu. This tells ComfyUI, “Yep, I know I don’t have a GPU, just go ahead with the CPU, thanks.” Load up the UI, import the example workflow from the Flux page, and off you go. For us CPU gang, just make sure to update the “clip_name1” to “t5xxl_fp8_e4m3fn.safetensors” in the DualCLIPLoader, then hit “Queue Prompt.” And voilà, your CPU will chug along, eventually spitting out some art—or, let’s be real, probably crash because, well, no GPU. But don’t worry, the adventure isn’t over! There’s always the Checkpoint model that ComfyUI kindly wraps up for us potato-PC folks. You’re back in the game!
Utilizing Checkpoints Officially Provided by ComfyUI - 使用ComfyUI官方提供的checkpoints
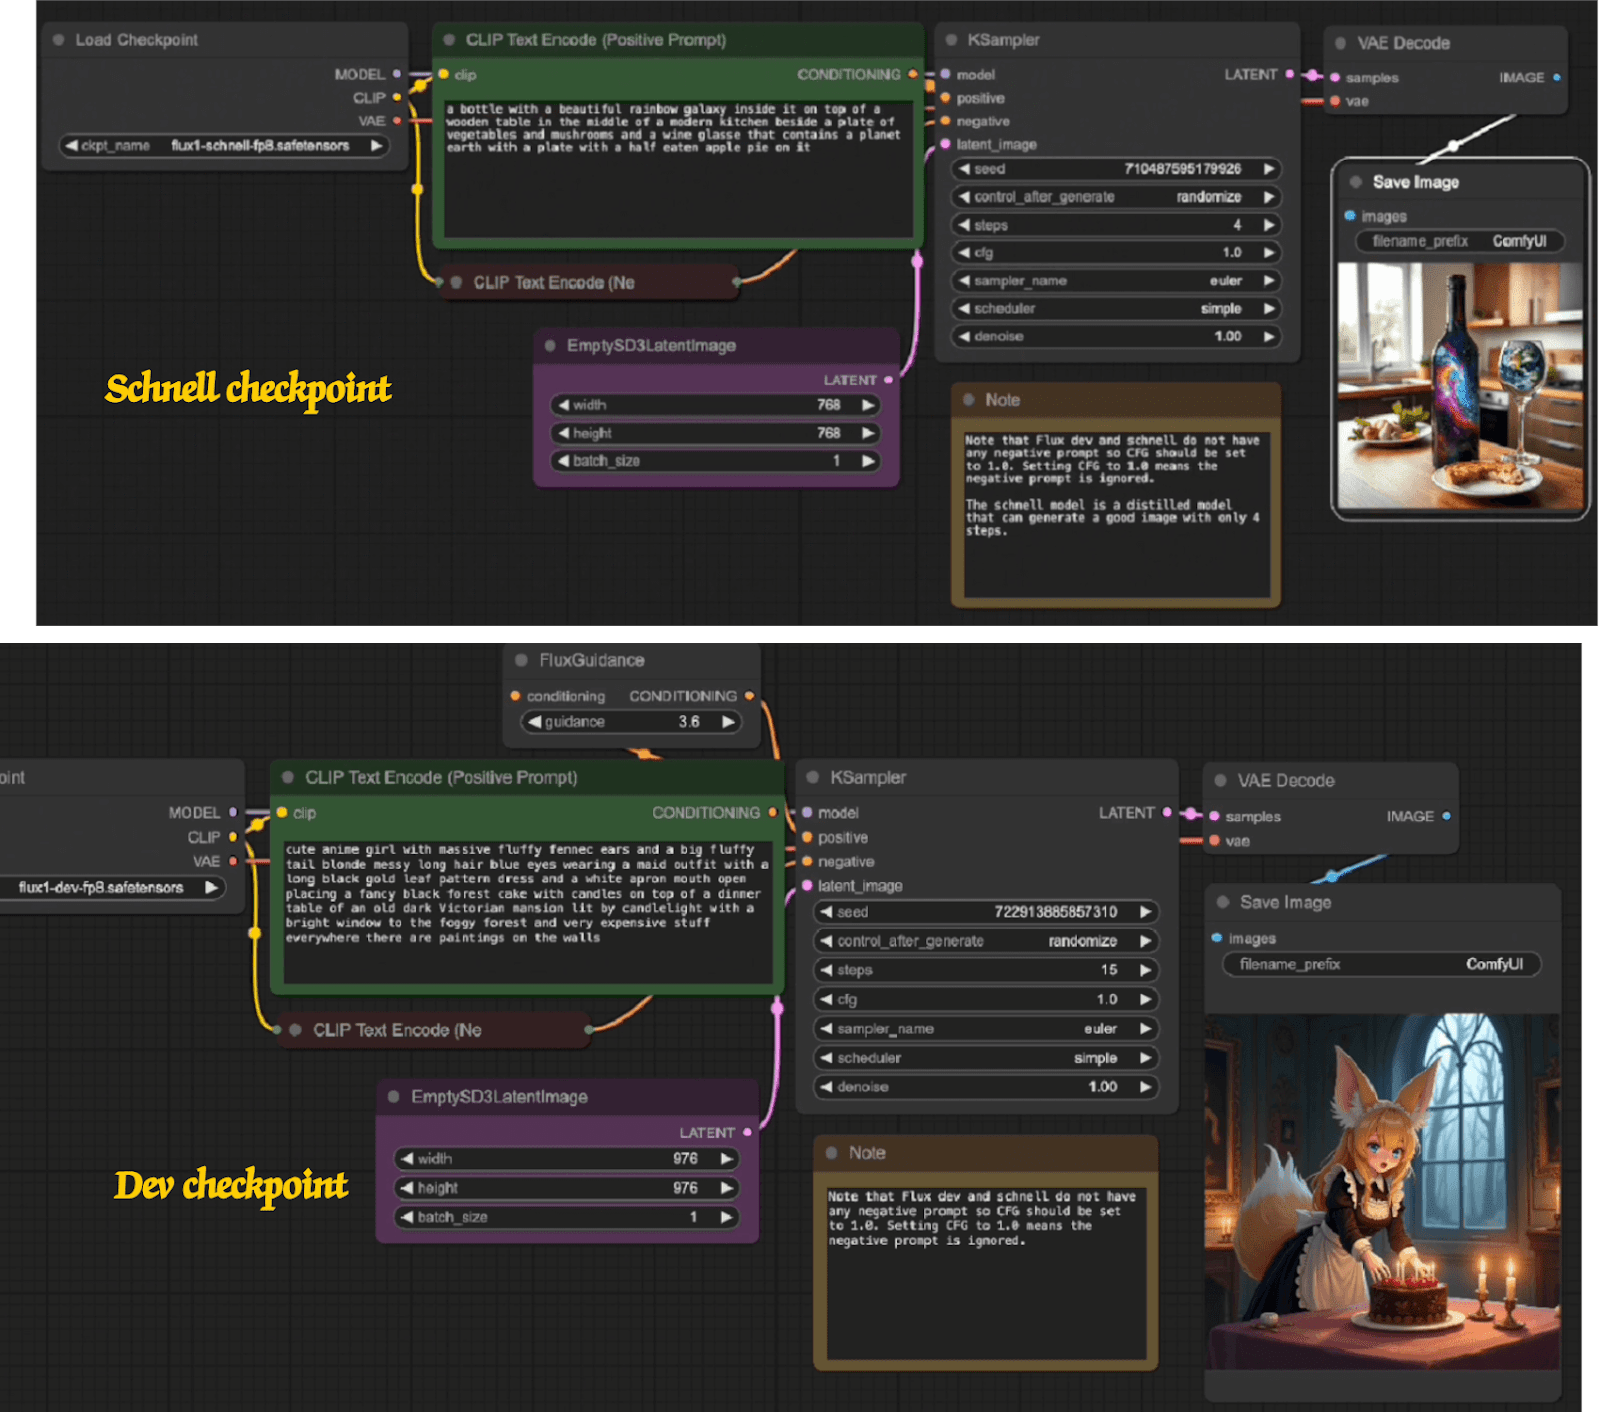
Now, let’s talk about using the checkpoints that ComfyUI kindly provides for us. If you head back to the ComfyUI Flux example page and search for “FP8 Checkpoint,” you’ll find two options. The first is “Flux Dev,” and the second is “Flux Schnell.” It’s kind of like choosing between fast and faster, but there’s a catch—if you’re working without a GPU, you’ll want to be smart about which one you pick.
Here’s how it goes: if you want to use the “Flux Dev” checkpoint, go ahead and download the corresponding workflow image. If you’re more of a “Schnell” person (aka a fellow potato-PC user), download that one instead. Once you’ve made your choice, follow the provided link to download the checkpoint, and then drop it into ComfyUI/models/checkpoints. Easy peasy!
Now comes the fun part—actually running ComfyUI. For those of us without a fancy GPU, the command to start is python main.py --cpu. This tells ComfyUI, “Hey, we’re doing this with just the CPU, so go easy on us!” After you launch ComfyUI, drag the workflow image into the interface and use the default settings. Just make sure you’re using the right checkpoint for your workflow (either Dev or Schnell), and hit that Queue Prompt button.
Now, here’s the only real difference between the two checkpoints: speed. “Flux Schnell” runs faster but might not give you the highest-quality images. “Flux Dev,” on the other hand, takes its sweet time but delivers more polished results. In my case, using “Schnell” took around 6 minutes to generate an image, while “Dev” clocked in at about 25 minutes. So, if you’re the patient type and want top-tier results, go with “Dev.” If you’re more about speed and just want to see something cool happen, “Schnell” is your friend.
Who needs a sleek, shiny GPU when you've got Flux AI and ComfyUI on your side? Your old potato PC might not be the fastest, but it's got heart. So, chuck that fancy GPU(It is better to have.) envy and dive into the world of AI art. With Flux, your imagination is the limit, not your hardware. Get comfy, get creative, and let's make some magic happen!