Showing posts with label ai艺术. Show all posts

Tuesday, 1 October 2024

Cloud GPU for ComfyUI: No More Tears Over Weak Local Hardware! - 云端GPU玩转ComfyUI:告别本地弱鸡显卡的眼泪!

From Potato to Powerhouse: Your ComfyUI Dreams, Now Served in the Cloud! - 从土豆变超算:你的ComfyUI梦想,云端助力实现!


The ComfyUI Conundrum: No GPU in local - ComfyUI 的难题:本地没有 GPU

Ah, the classic tale of David and Goliath, but in this case, David's slingshot is a potato masquerading as a GPU. Picture this: you're all set to create the next Mona Lisa of AI art, but your laptop's idea of heavy lifting is opening two Chrome tabs. You've got dreams of crafting masterpieces with ComfyUI's high-end models, maybe even some "creative" pieces that would make your grandma blush. But alas, your GPU-less reality hits harder than a rendered error message. Fear not, fellow potato-PC warriors! The cloud GPU cavalry is here to save the day. Who needs a beefy local setup when you can borrow muscles from the internet? It's like having a gym membership for your computer, minus the awkward locker room encounters.

Cloud GPU Solution #1: BizyAir - 云端解方1: BizyAir

Don't have GUP locally? Perfect! Let me introduce you to BizyAir, the fairy godmother of weak hardware. Just follow the yellow brick road (aka GitHub instructions) to install this magical plugin. Don't panic when it asks for an API key for the first time implementation – check Github instructions, step by step, this API key is easy to get! Once installed, restart ComfyUI faster than you can say "abracadabra," and voila! You're now the proud owner of cloud-powered nodes. It's like having a bodybuilder GPU living in your potato PC. There's more! BizyAir comes with a Flux node and workflow – it's like finding an extra fry at the bottom of your takeout bag. So, ready to turn your local ComfyUI into a cloud-surfing superhero? Let's ride this pixel wave!


Cloud GPU Solution #2: ComfyUI-Cloud - 云端解方2: ComfyUI-Cloud

ComfyUI-Cloud Cloud arithmetic is another solution! Imagine this: you, chilling with your favorite cup of cocoa, while ComfyUI effortlessly conjures your artistic dreams in the cloud. No more wrestling with hardware limitations, just pure creative bliss.

Intrigued? Setting up ComfyUI-Cloud is easier than teaching a parrot to say "banana." Just head over to their GitHub page, scroll down (don't worry, it's not that deep!), and find the installation instructions. See? Cloud power for your ComfyUI, made easy-peasy!

Thursday, 19 September 2024

No GPU? No Problem! Flux AI Image Magic on Your Potato PC - 无需GPU! 普通电脑也能玩转Flux AI绘画


no-gpu-flux

Turn your toaster into a
Leonardo machine! - 让你的破烂电脑秒变达芬奇工作室!

Video tutorial-视频

Introduction: The AI Art Revolution - 引言:AI艺术革命来袭

Hold onto your keyboards, folks! The AI art revolution is here, and it's not just for the tech elite anymore. Enter Flux, the new kid on the block that's got everyone talking. With a whopping 12 billion parameters, this open-source powerhouse is giving Midjourney a run for its money. But here's the kicker: you don't need a supercomputer to join the party. We're about to show you how to turn your trusty old PC into a digital Leonardo using ComfyUI and Flux. It's like teaching your grandma to breakdance - unexpected, slightly absurd, but absolutely amazing when it works! So, buckle up as we dive into the world where potato PCs create masterpieces, and maybe, just maybe, we'll spark a debate about whether AI can truly replace human creativity. Spoiler alert: it can't, but it sure makes for a fun ride!

Conducting a Foundational Installation of Flux According to ComfyUI Example - 根据ComfyUI例子做flux基础安装

Hey there, fellow potato-PC warriors! No worries, let’s dive into how to install Flux on your modest machine and make it work its magic, even if you’re rolling with integrated graphics like me.

Step one is to follow the example from ComfyUI, because let’s be real—copying the pros is how we all start! Head to ComfyUI’s GitHub page, find the “ComfyUI Examples” section, and scroll a bit until you spot “Flux.” Once you click on it, you’ll see a detailed guide that walks you through the installation process. The first thing to grab is a file called “Clip.” Now, Clip has a few versions, but unless you’re secretly hiding a 32GB beast of a GPU in your PC, you’ll want to go with the lighter option(The t5xxl_fp16.safetensors is for users with more than 32GB of VRAM.). For us, potato-PC gang members, that’s the t5xxl_fp8_e4m3fn.safetensors file. There’s also clip_l.safetensors, which you’ll definitely need. Just click the link, and it’ll whisk you away to Hugging Face for the download. After that, drop the files into the right folder: ComfyUI/models/clip. Boom, Clip is done!

Next up is VAE. It sounds fancy, but it’s really just another file to download. Grab ae.safetensors from the provided official link, and toss it into the ComfyUI/models/vae folder. Simple, right?

Now, onto the Flux models. Here’s the fun part: if you have a shiny GPU, you can use the Dev version. But for us, who are not so blessed in the graphics department, Schnell is the way to go. Download the Schnell model and toss it into ComfyUI/models/unet. Easy peasy!

Finally, it’s time to run ComfyUI. If you’ve got a good GPU (lucky you), the command is simple: python main.py. But for the rest of us, who have to rely on our CPUs, you’ll need to run: python main.py --cpu. This tells ComfyUI, “Yep, I know I don’t have a GPU, just go ahead with the CPU, thanks.” Load up the UI, import the example workflow from the Flux page, and off you go. For us CPU gang, just make sure to update the “clip_name1” to “t5xxl_fp8_e4m3fn.safetensors” in the DualCLIPLoader, then hit “Queue Prompt.” And voilà, your CPU will chug along, eventually spitting out some art—or, let’s be real, probably crash because, well, no GPU. But don’t worry, the adventure isn’t over! There’s always the Checkpoint model that ComfyUI kindly wraps up for us potato-PC folks. You’re back in the game!

Utilizing Checkpoints Officially Provided by ComfyUI - 使用ComfyUI官方提供的checkpoints

Now, let’s talk about using the checkpoints that ComfyUI kindly provides for us. If you head back to the ComfyUI Flux example page and search for “FP8 Checkpoint,” you’ll find two options. The first is “Flux Dev,” and the second is “Flux Schnell.” It’s kind of like choosing between fast and faster, but there’s a catch—if you’re working without a GPU, you’ll want to be smart about which one you pick.

Here’s how it goes: if you want to use the “Flux Dev” checkpoint, go ahead and download the corresponding workflow image. If you’re more of a “Schnell” person (aka a fellow potato-PC user), download that one instead. Once you’ve made your choice, follow the provided link to download the checkpoint, and then drop it into ComfyUI/models/checkpoints. Easy peasy!

Now comes the fun part—actually running ComfyUI. For those of us without a fancy GPU, the command to start is python main.py --cpu. This tells ComfyUI, “Hey, we’re doing this with just the CPU, so go easy on us!” After you launch ComfyUI, drag the workflow image into the interface and use the default settings. Just make sure you’re using the right checkpoint for your workflow (either Dev or Schnell), and hit that Queue Prompt button.

Now, here’s the only real difference between the two checkpoints: speed. “Flux Schnell” runs faster but might not give you the highest-quality images. “Flux Dev,” on the other hand, takes its sweet time but delivers more polished results. In my case, using “Schnell” took around 6 minutes to generate an image, while “Dev” clocked in at about 25 minutes. So, if you’re the patient type and want top-tier results, go with “Dev.” If you’re more about speed and just want to see something cool happen, “Schnell” is your friend.

Who Needs a Fancy GPU Anyway? - 谁说没有GPU就不能玩AI?

Who needs a sleek, shiny GPU when you've got Flux AI and ComfyUI on your side? Your old potato PC might not be the fastest, but it's got heart. So, chuck that fancy GPU(It is better to have.) envy and dive into the world of AI art. With Flux, your imagination is the limit, not your hardware. Get comfy, get creative, and let's make some magic happen!

Thursday, 12 September 2024

ComfyUI Inpainting Mastery: From Noob to Pro Without Breaking the Bank! - ComfyUI重绘大师:从小白到高手,白嫖也能玩转!

free-inpainting

Paint Your Dreams, Not Your Wallet! – 重绘梦想,不重绘钱包!


Video tutorial - 视频教程

Introduction – 序言

Welcome, ComfyUI enthusiasts! If you've been following our tutorials, you're probably already running ComfyUI locally and mastering the basics. But hold onto your pixelated hats, because today we're diving into the magical world of inpainting - the art of selectively repainting parts of an image. It's like giving your pictures a partial makeover without the expensive salon visit! Whether you're a digital Picasso or just someone who wants to remove that photobombing squirrel from your family portrait, inpainting is your new best friend. So, grab your virtual paintbrush, and let's turn those "oops" into "wow" without breaking the bank or your sanity. Who knows? By the end of this, you might just be the neighborhood's go-to digital plastic surgeon!

欢迎各位ComfyUI爱好者!如果你一直在跟着我们的教程学习,想必你已经能在本地运行ComfyUI,并掌握了基本操作。但是,各位请握紧你们的像素帽子,因为今天我们要深入探讨重绘的魔法世界 - 这项在图片中选择性重新绘制部分内容的艺术。这就像给你的照片做局部整容,而且不用花大价钱!无论你是数字世界的毕加索,还是只想把family photo里那只爱抢镜的小松鼠P掉的普通人,重绘都将成为你的新宠。所以,拿起你的虚拟画笔,让我们一起把"哎呀"变成"哇哦",既不伤钱包也不伤脑细胞。说不定到最后,你就成了街坊邻里公认的数字整容专家!

Basic Inpainting Techniques – 基础重绘技巧

So, you’re diving into the world of inpainting with ComfyUI, huh? Well, congratulations! But remember, just like that ancient Chinese proverb says, “A journey of a thousand miles begins with a single step.” No one becomes a pro overnight, so let’s start from the basics, and yes, that means copying the official example. Trust me, it’s not cheating; it’s smart learning!

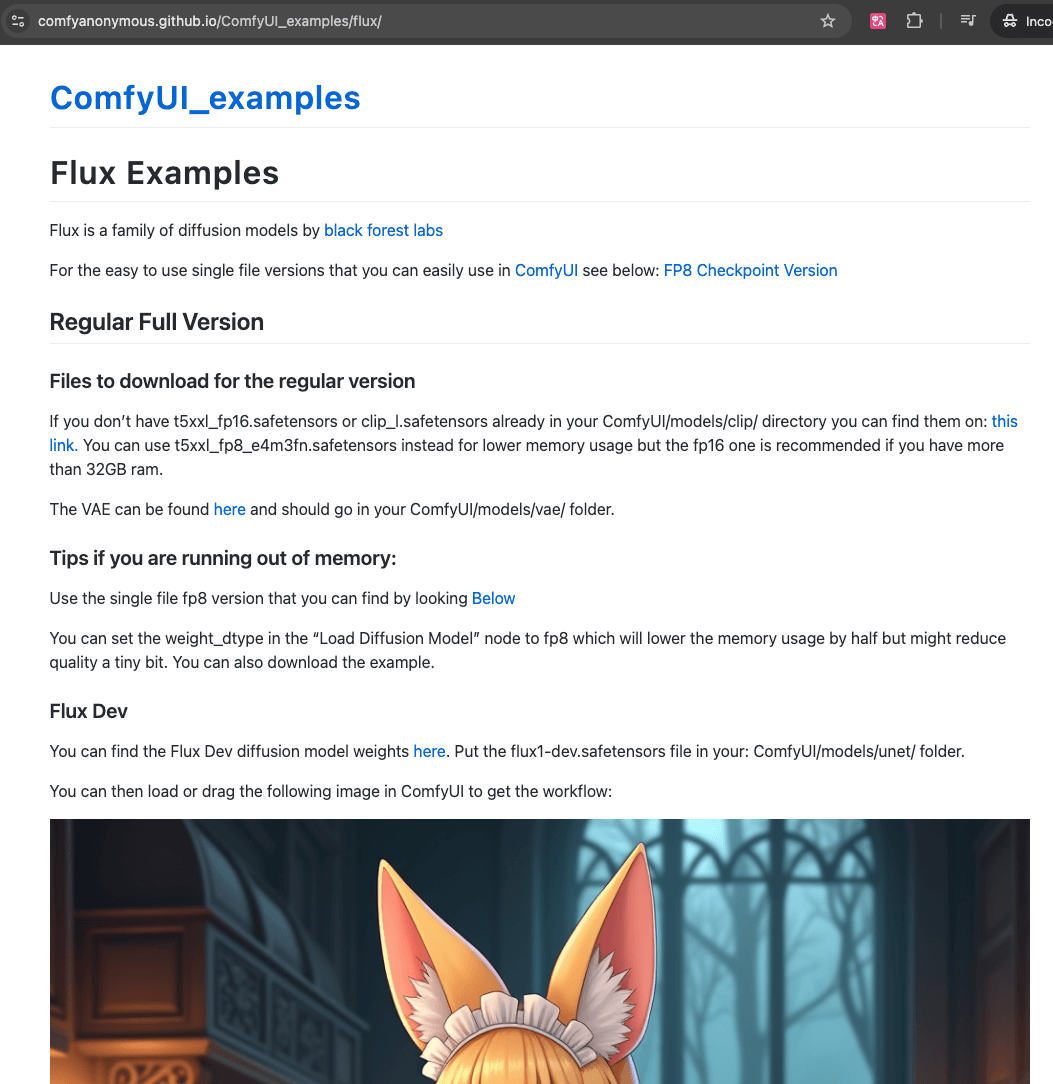
Head on over to the ComfyUI GitHub page, scroll down a bit, and click on ComfyUI Examples. There, you’ll find our golden ticket: the Inpainting Example—this is what we’ll be using as the blueprint for our inpainting mastery. Now, why start here? Because, just like a giant tree starts as a tiny seed, you’ve got to grow your skills from the basics. Download the images from the example: the first is a damaged image that needs fixing, and the second is the magically restored image with a cat(You have to download two pictures). Once you’ve got those, drag the restored image into your ComfyUI window. Boom! Now you can see the whole workflow. What’s next? You need a big model.

For this workflow, the example uses a 512-inpainting model, so head over to Civitai and search for something similar. This turorial recommends “djzGingertomcatV21768V21_21768”, you can choose the one you like. Download it and toss that model into your ComfyUI/models/checkpoints folder. Restart ComfyUI, and you’re golden—well, almost.

Now, here’s where we tweak a little. What if your image size doesn’t match the example’s? No problem! Just double-click on the blank canvas in ComfyUI and type “Upscale Image By,” then hit Enter. Do this a couple more times to add Upscale Image and Preview Image panels. Drag these into the blue group (yes, it’s all about dragging and dropping), and if necessary, resize the group to fit your newfound panels. You’re becoming a workflow artist now!

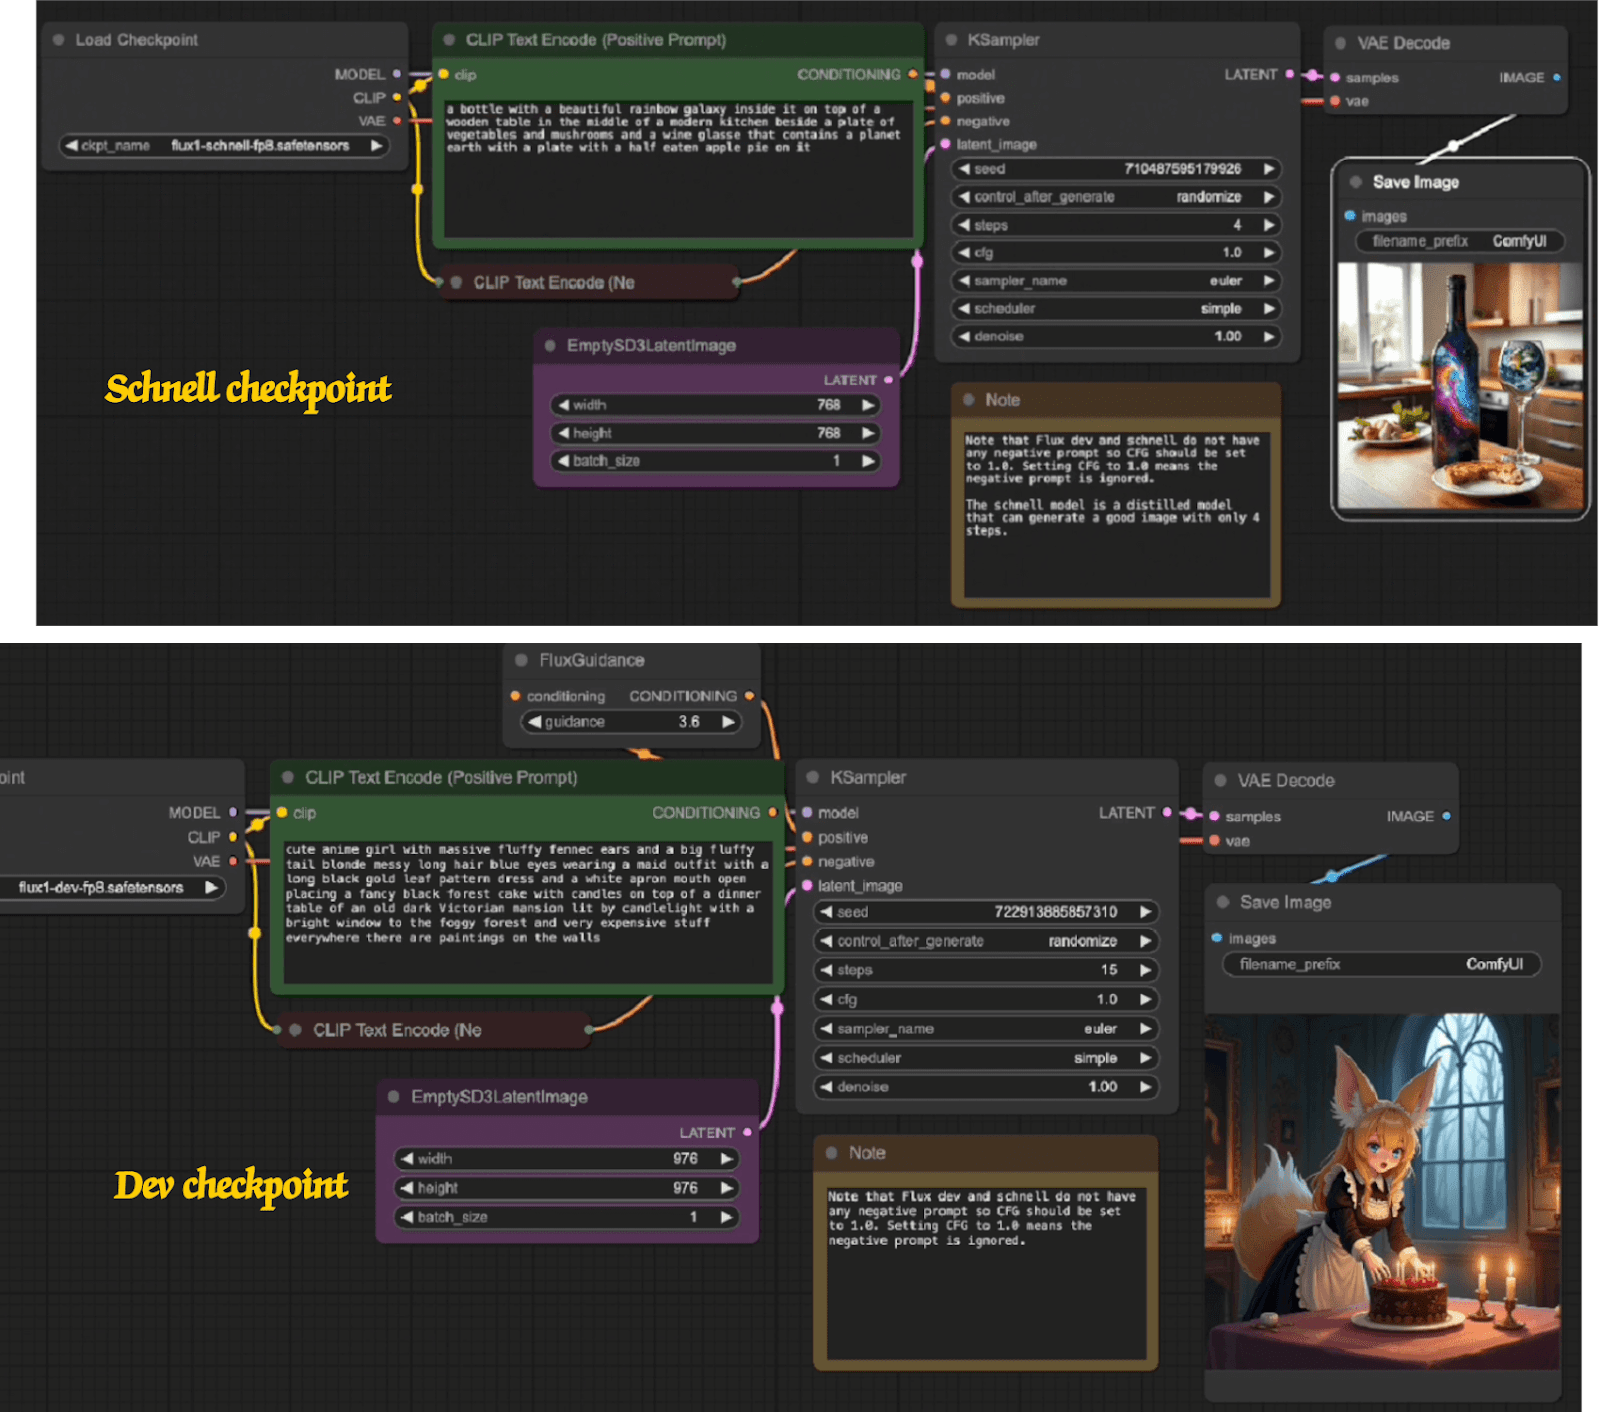
Got all that? Good. Let’s adjust some settings. First, in the Load Checkpoint panel, select that fancy model you downloaded. We won’t mess with the prompts this time; speed is key. Set the KSampler steps to 16 for a quick result—because who has time to wait forever, right? Drag that damaged image into the Load Image panel, and make sure the output size in the Upscale Image panel is set to 768x768. Now, press Queue Prompt and wait for the magic.

For those running without a GPU, just run ComfyUI with --cpu(python main.py –cpu), like a warrior in slow motion. It might take some time, but hey, patience is a virtue, especially when inpainting with a potato-powered machine. By the end, you’ll have a shiny new cat image, and more importantly, you’ll be one step closer to inpainting mastery. 

那么,你要用 ComfyUI 来学习重绘对吧?恭喜你!不过,老话说得好,“千里之行,始于足下。”想要成为大神,可不是一天就能搞定的!所以咱们要从基础开始学习,没错,就是模仿官方的例子。这不叫作弊,这叫聪明的学习方式!

首先,打开 ComfyUI GitHub 页面,往下滑,找到 ComfyUI Examples 链接。点进去,你会发现我们要用的宝贝—— Inpainting Example。这就是我们要模仿的例子!为什么要从这里开始?因为嘛,就像参天大树从一粒种子开始,技术也是要从基础练起。下载那个带缺损的图(需要重绘的),还有重绘完成的有猫的图片。(要下载两张图)下载完毕,把那张有猫的图拖进 ComfyUI 界面。工作流直接展示在你面前!接下来你需要一个 大模型。

这个例子用的是 512-inpainting model,所以赶紧去 Civitai 搜索一下。在本教程里推荐了“djzGingertomcatV21768V21_21768, 你可以选你喜欢的。”下载后,把模型丢进你的 ComfyUI/models/checkpoints 文件夹。重启 ComfyUI,差不多就准备好开始了。

接下来咱们稍微调整一下。如果你图片的尺寸和例子不一样,没问题!在 ComfyUI 空白处双击,输入“Upscale Image By”,然后按回车。再重复两次,添加 Upscale Image 和 Preview Image 面板。把这些新加的面板拖到浅蓝色组里(是的,全靠拖拽),如果地方不够,你可以把组拉大一点。现在,你已经成为了工作流高手,高手,高高手!

好了,现在开始调整设置。先在 Load Checkpoint 面板里选择你下载的模型。这次提示词就不改了,咱们要快点出结果嘛!把 KSampler 的步数设置成 16,这样可以快点生成结果。把之前下载的缺损图片拖到 Load Image 面板里,确保Upscale Image的尺寸设置为 768x768。然后按一下 Queue Prompt 按钮,等待几秒,魔法就会发生了。

对于没有 GPU 的小伙伴,启动 ComfyUI 时加上 --cpu(python main.py –cpu),慢慢来,耐心等待。虽然时间可能会有点长,但,嘿,慢工出细活嘛!最终你会得到一张崭新的有猫的图片,更重要的是,你离重绘大神又近了一步!

step1

Advanced Tricks: No GPU? No Problem! – 进阶秘笈: 没显卡?照样玩!

So, you’ve got no GPU? No problem! I’m right there with you, because guess what? My computer doesn’t have one either! But does that stop us from diving deep into ComfyUI’s inpainting magic? Absolutely not. In fact, it just makes us more resourceful, like a chef cooking a gourmet meal with nothing but a toaster oven. Let’s turn this challenge into an opportunity to learn some advanced tricks, all while keeping our wallets safe!

First thing’s first: we need to start fresh. Open your terminal and hit Ctrl + C to stop ComfyUI. Then, restart it by typing "python main.py". Once ComfyUI is back up, hit Clear on the main panel. Now, let’s clean up our workspace—select the blue group, right-click, choose Edit Group, and remove it. Bye-bye, group! We’re keeping things lean and mean. Then, delete the old “VAE Encode (for Inpainting)” panel—yeah, it’s time for an upgrade. Double-click on the blank canvas, type “VAE Encode”, and hit Enter. Repeat that for “Set Latent Noise Mask”. The 2nd panel will help us work with masked images, kind of like the missing parts we’ve dealt with before, but now, it’s on our terms. Once you’ve added these shiny new panels, just drag them into place like you’re organizing furniture in a tiny apartment.

Next up: the AI model. This time, we’re using the realisticVisionV60B1_v51HyperVAE model, so head over to Civitai and download that bad boy. Pop it into your ComfyUI/models/checkpoints folder, give ComfyUI a quick restart, and select the model in the Load Checkpoint panel. Boom, we’re ready to inpaint! Need an image? Here’s a fun trick: go to a random human face website. Just keep refreshing until you find the perfect face to work on. Load that image into the Load Image panel. A quick explanation of masking: The purpose of masking is to create areas that need to be redrawn. In the ‘Load Image’ panel, right-click and select ‘Open in MaskEditor’. Adjust the Thickness (brush size) and Opacity (visibility), then paint over the areas you want to redraw. Press the Option/Alt key to clear masked areas. Once you’ve finished masking the areas, click the ‘Save to node’ button, and you’re done. The masked areas are the ones that will be redrawn.


Now, for the magic touch—let’s talk settings. The forward prompt I used is simple but effective: “A person wearing a golden eye patch, high resolution, 4k.” Fancy, right? As for the negative prompt—nah, no changes there. In KSampler, set the steps to 24 and denoise to 0.6. Hit that Queue Prompt button, and give it a minute to work its magic.

The result? A crisp, detailed image that’s not only cool but also won’t take ages to generate like before. No GPU, no stress, just pure inpainting goodness! See, you don’t need to break the bank to create masterpieces. Patience, creativity, and a little bit of know-how are all you need!

没显卡?没问题!其实,我的电脑也没有显卡!但这能阻挡我们探索 ComfyUI 重绘的奥秘吗?当然不能!这反而让我们更有创意,就像一个厨师只用烤面包机做出了一顿美味大餐。让我们把挑战变成机会,学习一些进阶的重绘技巧,还不用掏空钱包!

首先,我们需要从头开始。打开终端,按 Ctrl + C 停止 ComfyUI。然后输入命令 "python main.py" 重新启动它。ComfyUI 启动后,先点击主面板上的 Clear 清空界面。接下来,咱们得稍微整理一下工作区——选中蓝色组,右击,选择 Edit Group,然后移除它。没错,咱们要轻装上阵。接着删除旧的 “VAE Encode (for Inpainting)” 面板,是时候升级了。双击空白处,输入 “VAE Encode”,按回车。再重复一次,输入 “Set Latent Noise Mask”。第二个面板将帮助我们处理遮罩图像,有点像之前处理缺失部分的方式,但现在我们更灵活。添加好这些新面板后,像摆家具一样把它们拖到合适的位置。

接下来是AI模型。这次我们用的是 realisticVisionV60B1_v51HyperVAE,去 Civitai 下载这个模型吧。下载后,把它放到 ComfyUI/models/checkpoints 文件夹,重启 ComfyUI,然后在 Load Checkpoint 面板里选择它。大功告成!现在我们准备开始重绘了!需要一张图片?我有个好主意:去随机人脸网站,不满意就刷新,直到找到你满意的脸,把它拖到 Load Image 面板里。快速讲一下遮罩, 遮罩的目的就是创建需要重绘的区域。在Load Image panel里右击,选择“Open in MaskEditor”. 调整好Thickness(画笔粗细), Opacity(可见度)。然后涂抹你想要重绘的地方。按Option/alt按键,可以清除遮罩的区域。画好要遮罩的区域后,点“Save to node” 按钮,就可以了。遮罩的区域就是我们会重绘的区域。

好了,接下来就是魔法时刻——设置一下参数。我用的正向提示词是:“A person wearing a golden eye patch, high resolution, 4k”。是不是很炫酷?反向提示词就不修改了。在 KSampler 面板里,步数设为 24,降噪值设为 0.6。点击 Queue Prompt 按钮,稍等片刻,看看魔法发生!

结果呢?生成了一张清晰细致的图片,不仅效果不错,而且生产速度比之前快了不少。显卡没有?没关系!我们照样能用重绘技巧,创作出精美的作品。不用花大钱,只需要一点耐心、创意和技术!

step2

sample


Tip: inpainting AI model – 妙招: 直接用重绘AI模型

Ever felt like your inpainting skills are stuck in the kiddie pool? Fear not, fellow art adventurer!  First, go to Civitai to download a model specifically for inpainting. In this tutorial, the model used is Realistic v6 B1 Inpainting.


Those fancy re-painting AI models can do the heavy lifting for you.  Let's ditch the "VAE Encode" and "Set Latent Noise Mask" panels – they're yesterday's news.  Just double-click on the empty workspace and type in "VAE Encode (for Inpainting)".  Hook it up like the awesome image in the guide, and then get ready to unleash your inner prompt master!


Remember that person we made with an eye patch?  This time, we'll use the same positive prompt: "A person wearing a golden eye patch, high resolution, 4k."  And for the negative prompt, well, we can totally reuse our old friend – "blurry, low-quality, distorted, deformed, extra limbs, missing limbs, text, watermark, unrealistic proportions, oversaturated, overexposed, underexposed, pixelated, noisy background, overcomplicated design, messy, poorly lit, cropped faces, too much contrast, overly detailed, unwanted objects, duplicate elements" You know the drill.


In the KSampler panel, crank the "denoise" setting to 0.66.  Hit the "Queue Prompt" button, and hold on to your socks!  ComfyUI will churn out a masterpiece that would make even the pickiest people proud.


有没有觉得你的修复技巧停滞不前?别担心,艺术冒险家们!首先去Civitai下载专用于inpainting的模型, 在本教程中用的是realistic v6 B1 inpainting.


那些花哨的重绘 AI 模型可以帮你完成繁重的工作。让我们抛弃"VAE Encode"和 "Set Latent Noise Mask"面板 - 它们已经过时了。只需在空白工作区上双击并输入“VAE Encode (for Inpainting)” 。 像指南中的那张酷图一样连接它,然后准备释放你内心的提示大师吧!


还记得我们之前做过的戴眼罩的人吗?这次,我们将使用相同的正向提示语:“A person wearing a golden eye patch, high resolution, 4k”(提示词目前不支持中文)。至于负面提示语,我们可以完全重复使用我们以前的老朋友——“blurry, low-quality, distorted, deformed, extra limbs, missing limbs, text, watermark, unrealistic proportions, oversaturated, overexposed, underexposed, pixelated, noisy background, overcomplicated design, messy, poorly lit, cropped faces, too much contrast, overly detailed, unwanted objects, duplicate elements” 你懂的。


在 KSampler 面板中,将“denoise”设置调到 0.66。 点击“Queue Prompt”按钮,然后屏住呼吸!ComfyUI 将会生成一个杰作,让即使是最挑剔的人也会感到自豪。

step3

Conclusion – 尾声


Keep going and master this fun skill! The unspeakable scenes or images you might generate in the near future… well, that’s just art calling!

合抱之木,生于毫末;九层之台,起于累土;千里之行,始于足下。那些在不久的将来你们可能会生成的不可描述的场景或者图片,都是艺术的感召。

Wednesday, 28 August 2024

Super Simple ComfyUI on Mac: Don’t Miss Out! - 超简单!在Mac上安装ComfyUI,赶紧学起来!

Get Comfy with ComfyUI – It’s Easier Than You Think! - ComfyUI,轻松上手 – 难道还不会?


comfyUI

Introduction: Why Mac Silicon Users Need ComfyUI - 简介:为什么Mac Silicon用户需要ComfyUI


Mac’s M1/M2 chips are like the overachieving kids in class—great at almost everything, except when it comes to art. With no discrete graphics card, drawing with AI seems like a pipe dream. Enter ComfyUI: the underdog hero that makes AI art on Mac not just possible, but smooth as butter. Don’t let your Mac’s integrated graphics hold you back; ComfyUI is here to turn your AI art dreams into reality. Why miss out on creating masterpieces just because you’ve got a Mac? Give ComfyUI a shot, and let your creativity flow.

Mac的M1/M2芯片就像班里的优等生,几乎样样精通,唯独在绘画上有些力不从心。没有独立显卡,用AI作画似乎只是天方夜谭。于是,ComfyUI登场了:这个不被看好的英雄不仅让Mac上用AI作画成为可能,还能让整个过程顺滑如丝。别让Mac的集成显卡限制了你的创造力;ComfyUI来帮你实现艺术梦想。难道就因为你用的是Mac就错过创作杰作的机会?试试ComfyUI,让你的创意飞扬起来吧!


Preparation - 基础准备


Before diving into the world of ComfyUI on your Mac, there’s some groundwork to cover. First up is Homebrew, your Mac’s best buddy for installing just about anything with ease. If you haven’t installed it yet, hop over to Homebrew and get that sorted—it’s like giving your Mac a Swiss Army knife. Next, Python 3.10 or higher is a must, as it’s the core of ComfyUI’s operations. You can grab it from the official Python website or let Homebrew handle it with brew install python3. Once installed, a quick python3 --version in Terminal will confirm if everything’s in place.

Now, let’s talk about conda or Miniconda. This isn’t just for show—it’s a handy tool for managing your Python environments, especially if your Mac is juggling multiple Python versions. You can download Miniconda from here. If you’re running a solo Python version, or your default is already 3.10 or higher, you can skip this step. Finally, to optimize ComfyUI on your Apple Silicon Mac, you’ll need to install cmake, protobuf, and rust using “brew install cmake protobuf rust”. These tools are more than just tech jargon; cmake speeds up workflows, protobuf handles the complex data serialization that’s key to AI-driven art, and rust ensures smooth concurrent processing—think of it as supercharging your Mac’s AI art capabilities. With these in place, you’re all set to make ComfyUI sing on your Mac!


在你的Mac上运行ComfyUI之前,需要做一些基础准备。首先是Homebrew,这个工具简直是你Mac的安装神器。如果还没安装,赶紧去Homebrew页面搞定它——这就像给你的Mac配备了一把瑞士军刀。接下来,你需要Python 3.10或更高版本,它是ComfyUI运行的核心。你可以从Python官网下载安装,或者用Homebrew通过brew install python3来搞定。安装后,在Terminal中输入python3 --version检查版本信息,确保一切就绪。

然后,我们来说说conda或Miniconda。这不是摆设,它是管理Python环境的好帮手,特别适合当你的Mac上有多个Python版本需要处理时。你可以从这里下载Miniconda。 如果你的Mac只运行一个Python版本,或者默认版本已经是3.10或更高,那这一步可以跳过。最后,为了优化ComfyUI在Apple Silicon Mac上的表现,你需要通过”brew install cmake protobuf rust”安装cmake、protobuf和rust。这些工具可不仅仅是技术名词;cmake加速了工作流程,protobuf处理复杂的数据序列化,AI驱动的艺术创作全靠它,rust则确保并发处理的顺畅——想象一下,它就像给你的Mac AI艺术功能装上了涡轮增压器。有了这些准备,你的ComfyUI就能在Mac上大展身手了!

The 5-Minute Magic: Step-by-Step Installation - 5分钟魔法:傻瓜式安装步骤:

Let's start this 5-minute adventure. First up, we gotta get ComfyUI from github. It's like going on a treasure hunt. Type in "git clone https://github.com/comfyanonymous/ComfyUI". Ta-da! Now we're in business. If you're not used to the git clone command, you can also just download it as a zip file and unzip it, which will also give you the ComfyUI repository.

Next stop, the ComfyUI root folder. Open up that terminal and type "cd {path}/ComfyUI". The folder called ComfyUI is the root directory of ComfyUI.

Now comes the fun part – configuring that venv thingy. "python3 -m venv {name_you_like, eg: cfui}" and then "source cfui/bin/activate". It sounds all sci-fi and complicated, but don't worry. If you want to bail out later, just say "deactivate". Easy peasy. Configuring a virtual environment(venv) allows you to install dependencies that work only in this virtual environment, without affecting your entire laptop working environment.

Time to install those dependencies. "pip install torch torchvision torchaudio" and then "pip install -r requirements.txt". It's like building a superpowered machine. And if you're feeling extra fancy, go ahead and update pip with "pip install --upgrade pip".

But wait, there's more! We need to add the ComfyUI-Manager git repo. Head over to "{path}/ComfyUI/custom_nodes" and type "git clone https://github.com/ltdrdata/ComfyUI-Manager.git". Once you've done that, just leave it be and do "cd../", return to the previous level of the directory and enter the startup command on the side. If you are not used to the git clone command, you can download the ComfyUI-manager zip archive and extract it locally. Then, if you need to, activate that venv again(command: source cfui/bin/activate). Run "python main.py" and boom! You're on your way to tech glory. To see the GUI, go to http://127.0.0.1:8188. If you see "Manager" and "Share" buttons, you know you've hit the jackpot.

Now, if you want to get all multilingual and fancy, support Chinese with this next step. Clone that "AIGODLIKE-ComfyUI-Translation.git" by typing "git clone https://github.com/AIGODLIKE/AIGODLIKE-ComfyUI-Translation.git". Of course you can also download the zip file. Then, manually move the whole folder into {path}/ComfyUI/custom_nodes. It's like giving your ComfyUI a language makeover.

Last but not least, get those custom check points from Civitai or Tusiart. Think of it as picking your favorite toy. In my case, I went with "Bonobo_XL". You can choose the one you like. Head to Civitai's official website, search for your dream check point, download it, and move it to {path}/ComfyUI/models/checkpoints.

咱们开始这五分钟的冒险吧。首先,我们得从 github 上获取 ComfyUI。这就像是去寻宝。输入 “git clone https://github.com/comfyanonymous/ComfyUI”。哇哦!现在我们开始上路了。如果你不习惯git clone 命令,也可以直接下载它的zip文件,然后解压缩,也会得到ComfyUI的repository。

下一站,ComfyUI 的根目录。打开终端,输入 “cd {path}/ComfyUI”。这个叫ComfyUI的文件夹就是ComfyUI的根目录。

现在好玩的部分来了 —— 配置那个虚拟环境。“python3 -m venv {你喜欢的环境名字,比如: cfui}”,然后 “source cfui/bin/activate”。听起来很科幻很复杂,但别担心。要是你以后想退出,就说 “deactivate”。很简单吧。配置虚拟环境可以使你安装的依赖只在这个虚拟环境中工作,而不会影响你整个laptop的工作环境。

该安装那些依赖项了。“pip install torch torchvision torchaudio”,然后 “pip install -r requirements.txt”。这就像是在打造一个超级强大的机器。要是你想更时髦点,那就用 “pip install --upgrade pip” 来更新一下 pip。

但是等等,还有呢!我们得添加 ComfyUI-Manager 的 git 仓库。去到 “{路径}/ComfyUI/custom_nodes”,然后输入 “git clone https://github.com/ltdrdata/ComfyUI-Manager.git”。一旦你完成了这个,就放那儿别管,然后输入 “cd../”,退回上一级目录,方面输入启动命令。如果不习惯git clone命令,也可以直接下载ComfyUI-manager的zip压缩包,然后在本地解压缩。要是需要的话,再激活那个虚拟环境(命令是: source cfui/bin/activate)。运行 “python main.py”,然后砰!你就踏上了科技荣耀之路。要看到图形界面,就去到 http://127.0.0.1:8188。要是你看到了 “Manager” 和 “Share” 按钮,你就知道你成功了。

现在,要是你想变得多语言又时髦,那就用下一步来支持中文。通过输入 “git clone https://github.com/AIGODLIKE/AIGODLIKE-ComfyUI-Translation.git” 来克隆那个 “AIGODLIKE-ComfyUI-Translation.git”。当然也可以下载zip文件。然后,手动把整个文件夹移到 {path}/ComfyUI/custom_nodes。这就像是给你的ComfyUI做一个语言大改造。

最后一步,从 Civitai或者吐司AI上获取那些自定义的checkpoint。把这想象成挑选你最喜欢的玩具。就我来说,我选了 “Bonobo_XL”。你可以选你喜欢的。去到 Civitai 的官方网站,搜索你梦想中的checkpoint,下载下来,然后把它移到 {path}/ComfyUI/models/checkpoints。

Beyond Installation: First Steps in the ComfyUI Playground - 安装之后:ComfyUI游乐场初体验:

Alright, folks! You've survived the installation gauntlet, and now it's time to dive into the wacky world of ComfyUI. 

First things first, let's fire up this bad boy. Type "python main.py" into your terminal like you're casting a spell. If your Mac starts smoking, you've done it wrong (just kidding, maybe). For you CPU lovers out there, add "--cpu" to the end. It's like telling your computer to run on hamster power - slower, but adorable.

Now, point your browser to http://127.0.0.1:8188. If you see a bunch of boxes and lines, congratulations! You've officially entered the twilight zone of AI art generation. Don't panic, those Unfamiliar workflow settings are supposed to be there.

Can't read English? Click that gear icon and find "AGLTranslation-language". Pick your language. Now you can be confused in your mother tongue!

Time to make some "art"! Pick a model like "Bonobo_XL" - because nothing says "I'm a serious artist" like naming your AI after a chimp. Click "Queue Prompt" and watch as your computer has an existential crisis trying to interpret your artistic vision. Check the "Save Image" panel for results. 

When you're done playing God (or more likely, a drunk toddler with crayons), head back to the terminal. Hit Ctrl+C like you're killing a bug. Boom! ComfyUI is sleeping. Want to tuck it in properly? Type "deactivate". It's like putting your AI baby to bed. “deactivate” will stop the virtual environment (venv - cfui), so as not to waste your Mac's resources.

Need to wake the beast later? Just whisper "source cfui/bin/activate" into your terminal. It's like the "Open Sesame" of the digital age, but nerdier. Then enter the command “python main.py”, and you can use ComfyUI again.

好了,各位!你已经闯过了安装的九九八十一难,现在是时候潜入ComfyUI的奇妙世界了。

首先,让我们把这个小家伙点着。在你的终端里输入"python main.py",就像你在施展魔法一样。如果你的Mac开始疯狂工作了,那你就做错了(开个玩笑,也许)。对于你们这些CPU爱好者,在后面加上"--cpu"。这就像告诉你的电脑用仓鼠发电 - 慢一点,但是超可爱。

现在,把你的浏览器指向http://127.0.0.1:8188。如果你看到一堆方块和连接线,恭喜你!你已经正式进入了AI艺术生成的暮光之城。别慌,那些陌生的工作流设置就应该在那里。

看不懂英文?点击那个齿轮图标,找到"AGLTranslation-language"。挑选你的语言。难道你不知道你的母语!

是时候创作一些"艺术"了!选一个模型,比如"Bonobo_XL" - 因为没有什么比用黑猩猩命名你的AI更能说明"我是个严肃的艺术家"了。点击"添加提示词队列",然后看着你的电脑试图解读你的艺术视野时陷入存在主义危机。在"保存图像"面板查看结果。

当你玩够了上帝(或者更可能是,一个醉醺醺的拿着蜡笔的小屁孩),回到终端。像拍死一只虫子一样按Ctrl+C。砰!ComfyUI睡着了。想要好好地把它塞进被窝?输入"deactivate"。这就像把你的AI宝宝哄睡觉。"deactivate"会停止虚拟环境(venv – cfui), 这样不会浪费你的Mac的资源。

之后需要唤醒这头野兽?只需要在你的终端里轻声细语"source cfui/bin/activate"。这就像数字时代的"芝麻开门",只不过更宅一点。然后输入命令”python main.py”, 就又能用ComfyUI了。

first-run