还在苦哈哈地手动剪辑带货视频?还在对着冗长的直播录像抓耳挠腮,不知道哪段能成爆款?别愁了!ffmpeg来拯救你!这可是个免费又强大的神器,能帮你一键切片,快速生成带货短视频,简直不要太爽!
为啥要用ffmpeg切片?因为咱普通人做带货,爆款这玩意儿,说白了就是撞大运。与其花大把时间在那儿精雕细琢,不如广撒网多捞鱼,多切几个视频上传,说不定哪个就火了呢?用ffmpeg切片,效率高到飞起,省下来的时间可以用来刷剧、带娃、甚至发呆,岂不美哉?(土豪请随意,咱比不了~)
想用ffmpeg切片,就得用到它的“segment”功能。中庸之道,截弯取直,直接上命令:
```
ffmpeg -i {theVideoName}.mp4 -c copy -map 0 -f segment -segment_time {how_many_seconds} -segment_list video-list.txt -reset_timestamps 1 {theVideoName}-%03d.mp4
```
看不懂?没关系,我来给你掰开了揉碎了讲:
{theVideoName}.mp4:就是你的原视频文件名。
{how_many_seconds}:你想切成多长的视频,单位是秒。比如15秒就填15,4分钟就填240。
-c copy:这是重点!直接复制视频流,不重新编码,速度快到你怀疑人生,而且画质无损!
-map 0:确保视频里的声音也一起切进去。
-segment_time:设置切片时长。
-segment_list video-list.txt:生成一个文件,记录切片信息,以后想合并视频就靠它。
-reset_timestamps 1:让每个切片的时间都从0开始。
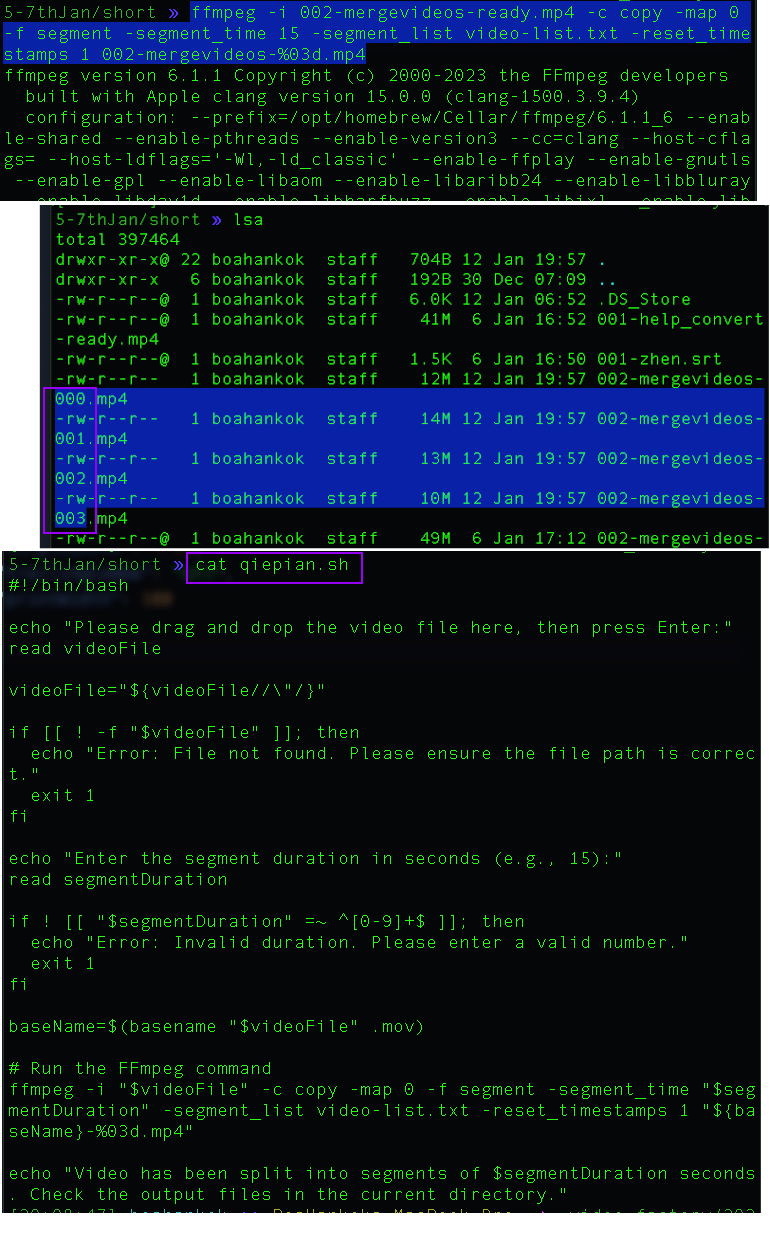
运行完命令,你会得到一堆 {theVideoName}-000.mp4、{theVideoName}-001.mp4 这样的文件,还有个 video-list.txt。
嫌命令行麻烦?没问题!咱还可以做个批处理文件(Mac → .sh, Windows → .bat)。
新建一个 qiepian.sh 文件:touch qiepian.sh
用 Vim 打开:vi qiepian.sh
把这段代码复制粘贴进去···
#!/bin/bash
echo "Please drag and drop the video file here, then press Enter:"
read videoFile
videoFile="${videoFile//\"/}"
if [[ ! -f "$videoFile" ]]; then
echo "Error: File not found. Please ensure the file path is correct."
exit 1
fi
echo "Enter the segment duration in seconds (e.g., 15):"
read segmentDuration
if ! [[ "$segmentDuration" =~ ^[0-9]+$ ]]; then
echo "Error: Invalid duration. Please enter a valid number."
exit 1
fi
baseName=$(basename "$videoFile" .mp4)
# Run the FFmpeg command
ffmpeg -i "$videoFile" -c copy -map 0 -f segment -segment_time "$segmentDuration" -segment_list video-list.txt -reset_timestamps 1 "${baseName}-%03d.mp4"
echo "Video has been split into segments of $segmentDuration seconds. Check the output files in the current directory."
···,保存退出(按esc,输入:wq)。
给文件加个可执行权限:chmod +x qiepian.sh
以后想切片,直接在终端输入 ./qiepian.sh 就OK啦!是不是超简单?

有了ffmpeg这个免费又高效的利器,带货切片视频还不是分分钟搞定?赶紧试试吧!
Tired of painstakingly manually editing product promotion videos? Frustrated staring at lengthy live recordings, unsure which segment will become a hit? Worry no more! ffmpeg is here to save the day! This free and powerful tool helps you slice videos with one click, quickly generating short videos for e-commerce, it's simply awesome!
Why use ffmpeg for slicing? For us ordinary folks doing online sales, achieving a viral product is mostly a matter of luck. Instead of spending tons of time meticulously editing, why not cast a wide net? Slice more videos and upload them; who knows which one will take off? Using ffmpeg for slicing is super-efficient, and you can use the saved time to binge-watch shows, take care of your kids, or even just chill! (For the big spenders, do as you please, we can't compete~)
To use ffmpeg for slicing, you'll need its "segment" function. Let's get straight to the point with a practical command example:
ffmpeg -i {theVideoName}.mp4 -c copy -map 0 -f segment -segment_time {how_many_seconds} -segment_list video-list.txt -reset_timestamps 1 {theVideoName}-%03d.mp4
Don't understand it? No worries, I'll break it down for you:
{theVideoName}.mp4: This is your original video file name.
{how_many_seconds}: This is the desired length of each video segment in seconds. For example, enter 15 for 15 seconds, or 240 for 4 minutes (240 seconds).
-c copy: This is key! It directly copies the video stream without re-encoding, making it incredibly fast and preserving the original quality!
-map 0: Makes sure the audio is also included in the segments.
-segment_time: Sets the segment duration.
-segment_list video-list.txt: Generates a file recording segment information, useful if you want to merge videos later.
-reset_timestamps 1: Resets the timestamp of each segment to start from 0.
After running the command, you'll get a bunch of files like {theVideoName}-000.mp4, {theVideoName}-001.mp4, and a video-list.txt.
Don't like using the command line? No problem! We can also create a batch file (a .sh file on Mac).
Create a qiepian.sh file: touch qiepian.sh
Open it with Vim: vi qiepian.sh
Copy and paste the code ```
#!/bin/bash
echo "Please drag and drop the video file here, then press Enter:"
read videoFile
videoFile="${videoFile//\"/}"
if [[ ! -f "$videoFile" ]]; then
echo "Error: File not found. Please ensure the file path is correct."
exit 1
fi
echo "Enter the segment duration in seconds (e.g., 15):"
read segmentDuration
if ! [[ "$segmentDuration" =~ ^[0-9]+$ ]]; then
echo "Error: Invalid duration. Please enter a valid number."
exit 1
fi
baseName=$(basename "$videoFile" .mp4)
# Run the FFmpeg command
ffmpeg -i "$videoFile" -c copy -map 0 -f segment -segment_time "$segmentDuration" -segment_list video-list.txt -reset_timestamps 1 "${baseName}-%03d.mp4"
echo "Video has been split into segments of $segmentDuration seconds. Check the output files in the current directory."
```, then save and exit (press esc, type :wq).
Give the file execute permission: chmod +x qiepian.sh
Now, when you want to slice a video, just enter ./qiepian.sh in the terminal! Isn't it super easy?
With ffmpeg, this free and efficient tool, creating product video clips is a piece of cake! Go ahead and give it a try!


